Source: Jelmer Offenberg
On my journey developing data science applications, I often encounter challenges surrounding data. Most of these challenges are related to data quality, data availability and documentation. In this write-up, I want to show you how you can overcome some of these challenges by using a nifty open source tool called Data Build Tool (DBT) developed by Fishtown Analytics. In this piece I will discuss the following:
- Our development process and its challenges
- Why mocking data is hard
- What is the added value of DBT?
- The key components in a DBT project
- DBT’s testing capabilities
- Lineage and documentation
- Some limitations that I encountered while using DBT
The development process
Starting off, I’ll briefly describe the development process for data science products at Albert Heijn, the company I work for. The current development process is centered around building Python packages that contains everything that is needed to run a data science project.
We have a automated CI/CD flow that tests and builds the application. The resulting package is versioned and pushed to Azure Artifacts so that it may be used for deployment. For batch jobs, the deployment ships the library to Databricks and configures a Databricks jobs cluster by specifying the dependent library and entry point script. When the job is launched, the library is automatically installed on the cluster and the entry point script is triggered.
This development process is straightforward and works quite well. Development and testing is done outside of Databricks since notebooks are just not comparable to a full-fledged IDE. This does introduce the issue of data not being available on your development machine. Shipping the library with every change to Databricks is not an option as it is time consuming and results in a slow development process.
There are a few integration tools that attempt to bridge this gap such as Databricks Connect, however, this limits the use of pytest-spark. Without diving into further detail, most integration tools come at a cost so we looked for a different approach. Since most development is done locally or on dedicated machines, data is not directly available during development. One alternative is to mock your data so you can develop and test locally. This approach was initially used for this project but has its own disadvantages.
Why mocking data is hard
The desire for a tool that could help bridge the gap between mock data and actual data became stronger as we further progressed in one of our projects. For this specific project we rely heavily on Databricks & Spark. Testing is done by creating a local spark session and using pytest-spark.
As input for testing we use mock data. We could also have drawn samples from the actual data, however, having these data samples in your codebase raises other issues such as larger repository sizes, company data on employee machines and the risk of having a huge bias in your sample data.
In the beginning we’re creating mock data for most of our input sources. The number of upstream dependencies is not that large yet. It’s doable to mock the input sources that we use, and we can run our tests at a blazing speed. It feels good, logic checks out, we’re good to go.

Scaling up
As the project scales up and our data scientists start adding more data dependencies, the complexity of creating and maintaining mock data increases rapidly. At a certain point it becomes difficult to maintain the mock data and tests. Pytest is a very flexible library and the use of conftest did take away a ton of work for us. However, at some point it’s just not enough.
Downstream more and more data sources are interacting with each other and small changes upstream can lead to very different results downstream. Updating mock data becomes a tedious job since you must account for many different edge cases.
At this point we have not even discussed documentation yet. Every time mock data is updated, tests must be reevaluated, and documentation updated. Documentation is done separately from the code, therefore it’s always lagging behind.

Add some DBT in the mix
This is where Data Build Tool (DBT) comes in. DBT’s focus is specifically on data transformation, it’s concerned with the T in ELT. It’s written in Python and the CLI version is open source. The cloud version is their managed version of DBT.
DBT is not a scheduler and it does not do data extraction or loading for you. It’s specifically there to streamline the data transformation process and help you build data lineage and documentation along the way.
How does DBT work?
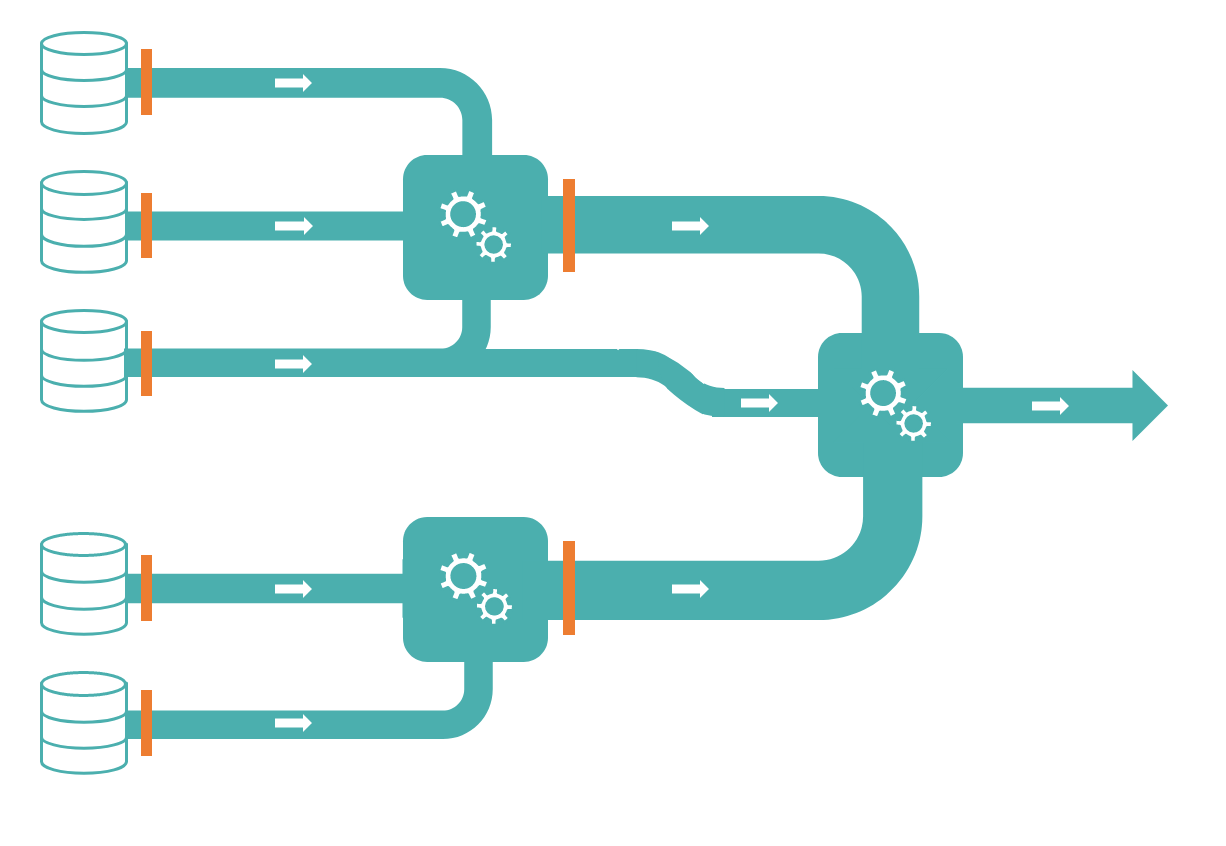
DBT allows you to model your data transformations by writing SQL SELECT statements with some Jinja and YAML in the mix for templating and writing configurations. Relationships are inferred from your models and you provide additional model properties such as tests and descriptions in YAML. A Direct Acyclic Graph (DAG)is constructed from your DBT project, which is visualized in the documentation, providing you information about data lineage. In addition, this DAG opens the possibility to run data models that are independent in parallel.
DBT takes care of the heavily lifting for you. When you run your DBT project, your models are materialized in different forms, depending on the settings. In this sense, DBT takes away much of the work surrounding data definition language. You’re mostly concerned with writing the statement that results in your table. Creating tables, writing inserts, upserts or creating snapshots is all done by DBT.
At first, using Spark SQL over PySpark felt like a step back since I’ve been a long-time user of the PySpark API. But as long as you’re not using structured streaming, there are no limitations. I especially like the pyspark-dbt library that adds support for merge statements for delta lakes. In addition, there are probably more people in your organization that can read SQL than Python. This makes it easier to sit down with stakeholders and discuss the logic at hand.
The key components of a DBT project
Let’s have a look at some of the key components of a DBT project. For this we’ll have a look at the default project skeleton that DBT provides when you initialize a project. We won’t dive into too much detail on how to create a project, since DBT provides a step-by-step tutorial with video instructions.
We’ll have a look at the following components:
- profiles.yml
- dbt_project.yml
- The models directory
- A model (SQL) file
- schema.yml
- The
reffunction - Macros
profiles.yml
By default, the profile.yml file is not stored in the project folder. This is done to avoid credentials being accidentally committed to your codebase. You can find your profile.ymlunder ~/.dbt/ unless you changed things around. This file contains the information that is needed to connect to your data store.
dbt_project.yml
This file describes the DBT project. The first section is concerned with the project naming, versioning and you can specify which config version to use. The second section specifies which profile to use for running DBT. In the third section you’ll notice that the different folders in this directory are described. This section tells DBT where to look for specific file files such as models, tests or macros. Finally, the last section is concerned with configuring models. These are default configurations such as materialization types and tags and that are passed to your DBT models.

The models directory
The models directory is where all the DBT models go. DBT models are just defined as SQL files. You can create sub folders in this directory if you want to make things a bit more organised. It’s important that you ensure that this folder structure lines up with the structure in the last section of your dbt_project.yml.
my_first_dbt_model.sql
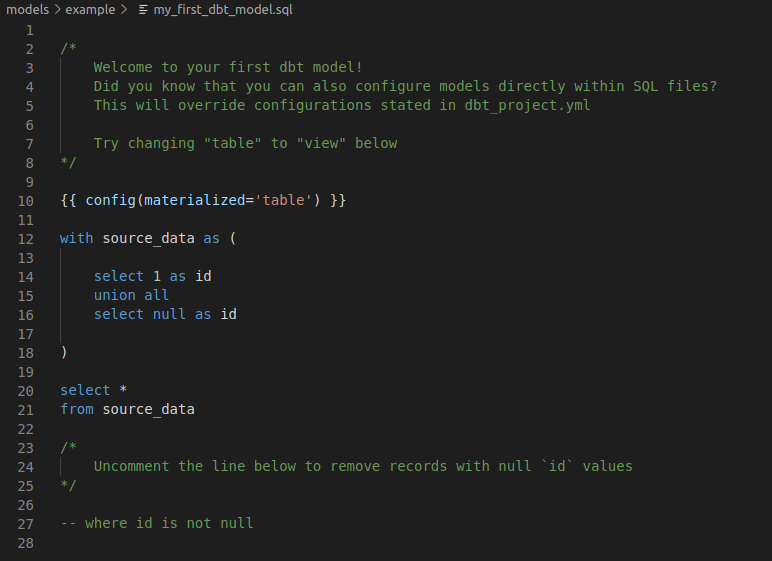
If we take a closer look at the toy example provided by DBT, we notice that DBT models are quite simple. The my_first_dbt_model.sql file shows a configuration section and then a the SELECT statement. Running DBT with this model will result in a table, as you can see from the config object. In this file it becomes clear that we’re only concerned with writing the SELECT statement, DBT will take care of creating the table and inserting the data.

schema.yml files
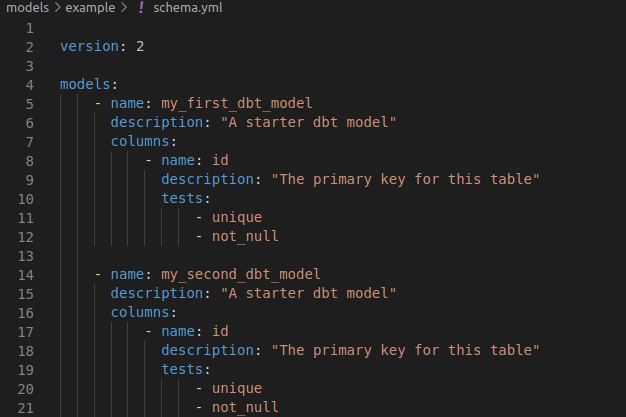
Let’s take a closer look at the schema.yml file. As you can see, this file defines additional properties regarding the two models: my_first_dbt_model and my_second_dbt_model. Both entries provide additional information such as model descriptions, column descriptions and tests.
It’s good to know that you can keep a single schema.yml file or you can make multiple files. Also, the file can be named anything you want. Once your project becomes more complex, you might want to make sub folders in the model directory with each their ownschema.yml file.

The ‘ref’ function
The ref function forms the basis of DBT. This function allows you to refer to other models in your project. As a result, DBT can interpolate schemas and infer the relationships between models like we discussed above. The picture below demonstrates how references work in DBT. You can see the DAG update based on the references.
Macros
DBT allows you to to write custom macros using Jinja and store these in the macros folder. As a result, you’ll end up with reusable components for your DBT project.
At Albert Heijn, the dates represented using integers is often used throughout different data sources. In SQL you would need to use date_format on a date object to obtain this information. Luckily for us, we can write a macro that makes it easy for us to reuse this component.
In the code below you can see how easy it is to wrap a short SQL statement in a macro. Even though this example is quite simple, Jinja allows you to add much more complex macros.
macros/date_macro.sql{% macro current_datekey() %}
date_format(current_date, 'yyyyMMdd')
{% endmacro %}
In our models we can now use this function like shown below.
models/sales.sqlSELECT
  DateKey,
  Store,
  Article,
  Sales
FROM
  {{ ref('source_sales') }}
WHERE
  DateKey = {{ current_datekey() }}
Testing with DBT
DBT offers a nice way to write and run tests. Running your tests in dbt can be done by running dbt test from the CLI. Optionally, you can specify to only run data tests or schema tests.
DBT provides two kind of tests:
- schema tests (more common): applied in YAML, returns the number of records that do not pass an assertion — when this number is 0, all records pass, therefore, your test passes
- data tests: specific queries that return 0 records
Out of the box there are a few schema tests available such as:
- not_null: checks if the column contains any null values.
- unique: checks if the values in the column are unique.
- accepted_values: checks the column contents against a list of accepted values.
- relationships: checks if the values in a column exist in a different table.
Luckily for us, Fishtown Analytics packaged up many useful schema tests in their dbt-utils package that can easily be added to your project. This adds a number of useful schema tests to your project.
Data tests are often used to check for specific business logic. These tests are stored in the tests folder in your DBT project. If the data test query returns zero records, the test passes.
Lineage and Documentation
DBT can directly generate a dependency graph from your project, and it allows you to run your data transformations in parallel. This is powered by the Ref functions that you use through your project.
On top of that, you can generate documentation by running
# Generate docs
dbt docs generate# Serve docs on a localhost
dbt docs serve
This will generate a web page that combines the information that you wrote in your YAML definitions, the relationships between your models and your tests into a single set of documentation. One thing I specifically like is the fact that you have your documentation together with the actual code, this makes it easy to sit down with others people involved in the project to discuss what’s happening.

To get a feeling of what the documentation looks like, you can visit this link. DBT is hosting the documentation of a toy example for you to check out.
Limitations
Adding DBT to your stack won’t solve all your problems. I’ve listed two limitations that I encountered while working with DBT.
Recording and reporting on tests
The tests that you can define and run with DBT provide a convenient way to do quality checks on your data. However, at the time of this writing it’s not easy to store and monitor these test results. In my opinion, this leaves a gap that is yet to be filled. Currently, we rely on a custom solution that logs metrics of interest to our logging framework. Ideally, we would want to store the DBT test results and monitor the data quality over time.
There is a feature request open to support the recording of test information. This is a feature that I’m looking forward to.
Linting of Jinja SQL code.
Support for linting Jinja SQL code is still in development. There is some work being done by the folks of SQL Fluff, but this is still in an early stage of development. SQL Fluff does not yet integrate well with additional dependencies such as dbt-utils.
In conclusion
In general DBT is a great addition to projects that heavily rely on data transformations. It’s lightweight and easy to step into. If you’re looking for a tool that can help streamline your data transformation process, have a look at DBT. Additionally, DBT allows you to add more structure to your development process. Separated environments, extensive testing and documentation are all part of DBT.
I’m looking forward to new features that allow data quality monitoring out of the box. This gap is yet to be filled and in my opinion this is something that would be a great addition to what DBT already has to offer.
